Creating mods
Getting started
Open the game folder and create folder named mods if it doesn't exist already.
Navigate inside the mods folder and create a new folder for your mod. The name should be alphanumeric and underscores should be used instead of spaces.
Inside of the folder of your new mod create a text file named index.json. This file describes the metadata for your mod.
Example contents of index.json:
{
	"name": "Example mod name",
	"description": "This is my example mod",
	"version": "1.0",
	"date": "2022-03-19",
	"author": "tulevik.EU",
	"game_name": "Office Management 101",
	"game_version": "0.5.14_alpha",
	"game_version_code": 1522,
	"min_game_version_code": 1522,
	"affects_savegames": false,
	"requires_asset_reload": false
}
Modify the values of the fields accordingly.
Launch the game and select Settings in the main menu. If the game detects existence of mods the Mods menu will appear.
In the Mods menu your newly created mod should appear and can be enabled and disabled.
Adding furniture to your mod
At the moment our freshly created mod doesn't do anything.
To add a new furniture item so it can be used in the game we need to create a new folder in the root folder of your mod called presets.
In there create a file called furniture.json.
Example contents of furniture.json:
{
	"categories": {
		"modded": { name: "Modded furniture" }
	},
	"furniture": {
		"example_item": {
			"name": "Example item",
			"downcase_name": "example item",
			"description": "This is my modded example item",
			"categories": [ "modded" ],
			"price": 100,
			"dimensions": [1, 1],
			"spritesheet": "mod_example_mod",
			"textures": {
				"default": [1, 2, 3, 4]
			},
			"walkable": false,
			"level": 1,
			"quality": 5,
			"can_break": false,
			"placement": "normal",
			"can_buy": true,
			"can_move": true,
			"can_trash": true,
			"can_sell": true,
			"prevent_on_wall": false,
			"prevent_on_floor": false,
			"prevent_furniture": true,
			"allow_indoors": true,
			"allow_outdoors": true,
			"lighting": 0,
			"block_lighting": 0
		}
	}
}
Now create the following folder structure in the root folder of your mod for your spritesheet: data\furniture\.
Inside that folder create a .png file with the same name as defined in the "spritesheet" field in furniture.json. For example: mod_example_mod.png.
Note that the "spritesheet" field in furniture.json does not contain the file extension.
The size of the spritesheet image should be 512x256 pixels and each sprite size is 32x48 pixels.
Uploading your mod to Steam Workshop
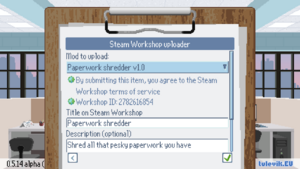
Launch the game, select Settings and then Steam Workshop uploader.
From the Mod to upload dropdown menu select the mod you wish to upload. Set the title, description and cover image for your Workshop page and click the green checkbox button in the bottom right corner.
The image file you wish to use must be in the root folder of your game and in .png format.
You may be redirected to the Steam Workshop terms of service page in the process to accept the agreement.
Note that the uploaded mod will be available to the public right away.
